
Miniature photography guide
Hi there. Welcome to my miniature photography guide. I have seen a lot of people posting pictures of their models around the net on places such as warseer and dakkadakka, but so often their photos look fuzzy or dark and lose a lot of detail in the model, which is a great shame since most of them are kick-ass models that deserve to be shown off. In an effort to stop repeating myself to everybody, I have created this page as a guide to hopefully help a bunch of you take better pictures of your models in a simple way without resorting to a lot of photography jargon.
Hopefully you will learn here to to set-up a quick but effective photo area, what all those crazy options in your camera do and end up with some ace pictures such as we have in our minatures gallery (shame about the models though!).
Setup the Area
Ok, the first thing you will need to do before taking pictures is make your 'studio'. Now, before I hear the cries of "that sounds too complicated" and "what, am I made of money?", listen up. this is a simple task. Firstly, you will need:
- Camera. I am assuming you have one of these already as almost everyone does nowadays, but allow me to make a few comments. If you are putting your pics on the web then digital is the way to go. Of course, it is possible to take pictures on an old film camera and get them developed and then scan them in but I seriously doubt it is worth the hassle and can you even buy compact film cameras anymore? A good enough digicam can be had for about £60 these days. In terms of miniature photography, you want one with a macro mode (will explain later) and a tripod mount (pretty much all modern digicams).
- Tripod. To avoid blurring in your pictures a tripod is essential. A tripod can be picked up for about £7 online (and even in some camera shops *shock*) so you really have no excuse. If funds are extremely limited, you can resort to resting it on a box or beanbag but you will lose a lot of flexibility in positioning.
- Paper (for the background) and Boxes (for models to rest against)
- Sunlight!
See that wasn't so hard now? The most essential thing about setting up your studio is lighting. What you want is to put it in a place where there is as much natural light as possible. this means next to window or even outside on a garden table if possible. I personally have a conservatory on the back of my current house which is ideal.
Once you have found somewhere with natural light, set up your base and backing boxes and tape the paper between them so that it curves gently from horizontal to vertical positions. If you had folded the paper in the middle then you would have had an annoying dark shadow line across the middle of your picture.
Place the models on the stage you have made and set up your tripod next to the table so that the camera is at a height almost equal to the models (or a few cm higher if you need to fit lots of them in the shot). I have used 2 sheets of A4 taped together for the background but it's better to use an A3/A2 sheet if you have one as it will avoid an unsightly line down the middle.
You should end up with something like this which took me all of 5 mins to set up.
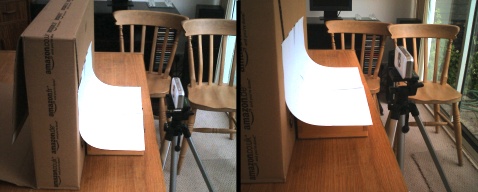
Image of setup area
Focus
Ok, now onto the actual photography. Firstly, you will need to focus your camera. You will need to activate 'Macro' mode which is a special camera mode used for focusing on things which are closer than 30cm. It is usually indicated on your camera by a little flower icon. It is activated on different cameras in different ways and in some (like mine), comes on automatically when you autofocus on something close.
if you are using autofocus, make sure the autofocus sampling box is centred on your model or you will be focusing on the white background and your model will be blurred out.
Also, at macro zoom levels, depth of field is generally quite small. This means that the distance over which things will appear in focus is quite short. So bear in mind that if you are focusing on a squad, the man at the front might be in focus but the ones at the back might not.

Models at the front are out of focus while the one at the back is in focus
White balance/Colour Temperature
We all know that objects look different colours depending on what colour of light you shine at them. Well, depending on the current weather condition and whether you have any interior lights on etc, the colour of your photographs will change, meaning that when you look at them on the computer, they might look a slightly different colour to when you painted them.
This can be corrected later on in photoshop or similar, but it is most easy if you correct the 'White Balance' on your camera while taking the shot. Most cameras offer this option and will usually let you select from a list of presets (e.g. cloudy, tungsten bulb, flourescent bulb etc.) which compensate for your current conditions.
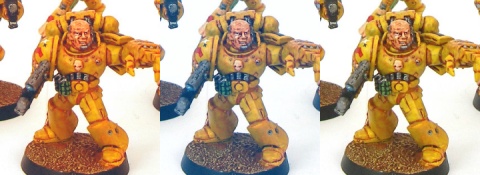
Left: too much red, Middle: Too much blue, Right: White balance selected properly
Exposure
The second biggest problem I see apart from blurring/focus, is photos which are too dark. I have already emphasised the need for enough natural light. Preferably take your picture on a sunny day next to a window or outside. DO NOT USE THE BUILT IN FLASH. It will create an unnatural look to your models and distort the paint colours.
If you are using a digicam you should be able to see the preview on the screen and whether it is bright enough. The image below right is what you are aiming for. Some cameras auto-exposure will make the image darker becuase of the large amount of white in the background, darkening your model also. If the image is too dark, use the exposure compensation controls to adjust. My camera requires between +0.9EV to +1.2EV but this will depend on your camera and situation.
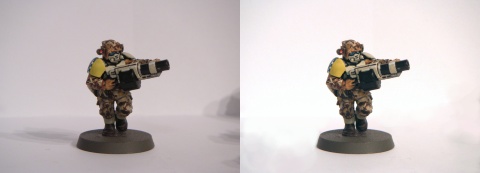
Left: Underexposed, Right: Correctly exposed
Now, if you have checked all the above things, take the picture! Be careful not to bump the camera too much when pressing the button as camera motion can blur the image. If this is a problem, put it on a 2 second self timer or something.
Post Production
Sometimes, even with the best of attempts, an image comes out slightly the wrong colour or slightly too dark. in this case, you can attempt to clean it up using some image editing software. Photoshop is great if you can afford it, but for the rest of us mortals I recommend the more affordable Photoshop Elements or Paint Shop Pro v7-v9. I would also recommend the excellent freeware tools GIMPshop and paint.NET. This is not the place to go into detail on digital image editing, as there are many good guides around the internet, but I would recommend getting familiar with the automatic colour balance, brightness/contrast, levels and gamma correction controls.
Filter by tag
Filter by author
Filter by month
External joint blogs
The PCRC also maintains several joint blogs via Warseer:
External blogs
Who's online
There are currently 0 users online.